Crockpot Potato Soup

Crockpot Potato Soup from Hoping in GodThis picture is kind of yucky but this soup is really good!!! I’ve been changing a lot about the way I run my home in 2014 (cleaning calendar, cooking more often, staying in budget)  and it has been working out so well! I hope to write a few posts on all that in the near future. I feel like I often try new things and they flop 75% of the time. Which happens you know? So it’s okay. But it just makes it all the more a miracle when 75% of the things I’ve been trying since the new year have WORKED! It has been so encouraging to me! One of the biggest shifts for me has been the budget. My husband and I have basically spent 6 years of our marriage having 2 incomes. Even after Bryan was born and I stayed home, since I was paid on a school year, I continued getting a paycheck for about 6 months (it was a huge blessing!)

But that’s the case no longer. And man it has been a huge paradigm shift going from a loosey goosey budget to having to count pennies and not being to able to buy things you want or need because you’ve spent your money this month. NOW! Please don’t get me wrong. We are super blessed financially and are able to eat well and go out to eat some and buy some non-essentials… we are not struggling. But compared to living with two incomes and no kids? One income for 3 people (and 2 people staying home and eating at home all day!) is rough!

I’ve been cooking a lot more since I’ve been staying at home and two things I’ve been doing are

  1. Cooking big portions that my baby and I can eat for lunch for days and
  2. Trying to start cooking a few “meatless meals.”

The second one is so hard!!! This was my first successful one that I felt was filling enough for my meat-loving hubby. And it was YUMMY!!! I’ve made it twice since then. It’s super filling and makes for great leftovers! And is delicious with bacon on it… meat free… or maybe just not mainly meat:)

But help me out!! What are your favorite meat less? Or what are some of your favorite cost effective meals? 

Crockpot Potato Soup

slightly adapted from I Heart Naptime

Ingredients:

  • 4-6 medium potatoes, peeled and diced in 1/2 – 1 inch cubes
  • 2 cans cream of chicken
  • 1 can cream of celery
  • 2 cups half and half (could also do milk, if trying to be healthier)
  • 6 T butter
  • 1/2 t. pepper
  • 1/2 t. salt
  • 1 t. onion powder
  • 1 t. garlic powder
  • 1/4 t. cayenne
  • 1/4 t. thyme
  • 1 1/2 cups grated cheddar cheese (plus additional for sprinkling on top)
  • 1 bunch green onions thinly sliced (about 1/2 cup -optional, for serving)
  • 4 strips bacon (optional, for serving)

Instructions

  1. Place potatoes, soup, half and half, butter and spices in crockpot. Stir. Cook on low 6-8 hours (or high 3-4). Check potatoes about an hour or two before you want to serve and make sure the potatoes are cooked through. If not, turn up to high, or if already on high, cut potatoes smaller.
  2. About 15 minutes before serving, preheat oven to 400 degrees and cook bacon in 400 degree oven for 10 minutes or until crispy. Let cool briefly and crumble bacon. Set aside.
  3. Stir cheddar cheese in soup. Taste and adjust spices if needed.
  4. Ladle soup in bowls, sprinkle additional cheese on top with green onions and bacon and a dash of extra pepper.

Note: This can EASILY be made on the stovetop in about 30 minutes. Chop potatoes and add all ingredients in large stockpot or dutch oven. Boil for about 20 minutes or until potatoes are cooked throughout. You may find they will fall apart and you will have smoother, less chunky soup in this method. 

Posted in Cooking | Tagged , , , , , , , , , , | 7 Comments

Sweet & Salty Caramel Corn

Sweet & Salty Caramel Corn from Hoping in God

You guys!!!! I made caramel corn!

Sweet & Salty Caramel Corn from Hoping in God

I love making something for the very, very first time. I’ve never been a big caramel corn person but when we went to a pumpkin patch this fall we bought freshly made caramel corn and it was delicious! As I was planning food for the super bowl, that sweet, salty poppable caramel corn came into my mind.Sweet & Salty Caramel Corn from Hoping in God

I saw a recipe on the wonderfully fabulous Annie’s Eats. It was a GIANT recipe but it apparently it keeps forever.

Sweet & Salty Caramel Corn from Hoping in God

And honestly? Umm… it was so good. I gave a gallon ziploc bag to a friend, we ate most of it at our party and Bryan and I finished the rest in a week.

Sweet & Salty Caramel Corn from Hoping in God

The idea of it sounds complicated, but you don’t have to make your own caramel with a candy thermometer and such. Just boil some sugar and go! It does take about an hour and a half of hands on time though because you bake the popcorn for an hour or more and have to stir it every 10 minutes or so.

Sweet & Salty Caramel Corn from Hoping in God

You guys this is just so, so good.

Sweet & Salty Caramel Corn from Hoping in God

Caramel Corn

from Annie’s Eats; originally adapted from Christie’s Corner

Yield: about 16-20 servings

Prep Time: 30 min/ Cook Time: 60 min

Ingredients:

  • 1 cup popcorn kernels, unpopped
  • 1 cup (2 sticks) unsalted butter
  • ½ cup light corn syrup
  • 2 cups packed light brown sugar
  • 1 tsp. kosher salt
  • ½ tsp. baking soda
  • 1 tsp. vanilla extract

Directions:

  1. Pop popcorn using any method you like. (Annie likes Whirley Pop so I borrowed my friend’s and it worked great!) Place the popped popcorn in a very, VERY large bowl (or two VERY large bowls – you will need to be able to stir and toss the caramel on top).  MAKE SURE TO REMOVE ALL UNPOPPED KERNELS!
  2. Preheat the oven to 250° F.  Prepare at least two very large baking sheets lined with parchment paper. Set aside.
  3. Meanwhile, make the caramel. In a 2 quart saucepan, melt butter over medium heat. Once melted, mix in corn syrup, brown sugar and salt.
  4. Increase heat to medium high. Bring the mixture to a boil, stirring frequently. Once it reaches a boil, stop stirring and let boil for 5 minutes.
  5. Remove from heat and add in baking soda and vanilla. The mixture will froth and bubble up. Stir.
  6. Pour the caramel sauce over the popcorn in the bowls and toss to coat. Gently using salad spoons can be a very helpful tool. I started with a little at a time, tossed, then added more.
  7. Work slightly quickly so it doesn’t cool and spread the popcorn evenly onto the baking sheets (there may be some caramel clumps.)
  8. Bake for 40-60 minutes, removing from the oven to gently stir every 10 minutes. After 35-40 minutes, taste a piece (or two or three) of popcorn. When it’s done it should be crispy but still slightly mushy when you bite it – bake for another 10 minutes if not. (Taste then if not done, bake for 10 minutes more.)
  9. Remove the baking sheets to a wire rack and allow popcorn to cool completely before breaking apart for serving or packaging.
  10. Store in an airtight container or ziploc bag and this should keep for a long time. Enjoy!

IMG_5347

Posted in Baking | Tagged , , , , , , , | 1 Comment

Favorite Baby Items: 4-8 Months

My baby is 10 months and I’m JUST now getting around to posting this. My bad. It seems life only gets busier as they get older!! :) Here are some of my 4-8 month favorites!

Sleeping:

 Zippered Sleepers –  We always used both snaps as zippered but as he got older he would quickly roll and crawl away ANY time we changed his diaper or tried to change his clothes. Zippers made this a little easier.

Sleep Sacks (medium) –  We are OBSESSED with our sleep sacks!!! They are a huge “sleep time” cue for Bryan and I love that they keep him warm without the worry of a blanket in the crib. For the summer/ fall we had both cotton and fleece ones and we use mostly fleece in the winter.

Overnight Diapers – It is SO nice once they’re old enough to not change their diapers all night:) I stopped changing Bryan’s diaper but then if he woke up a time or two sometimes he would leak through. I started doing overnight diapers in a size up (have used both Pampers and Huggies) and they are GREAT and usually don’t leak. Overnight diapers… seems obvious but it took me asking friends to begin it:)

Twinkle Twinkle Little Scout or Gloworm– Or any night time toy! (That Scout is actually discontinued – sad!) We have that and his glow worm in his bed every night.

Sound Machine – This is the one we have and I’ve got to believe there’s something better. A few months after we started using it, the white noise button doesn’t work anymore. The projector is finicky and sometimes doesn’t move. HOWEVER – I LOVE, LOVE, LOVE having a sound machine. It is a huge cue for Bryan that it’s time to sleep (sometimes he will rub his eyes the second I turn it on!) and it’s nice to drown out other noise, especially if we have people over.

Eating:

Chicco 360 Hook on High Chair – We LOVE this. It takes up no room and I love that Bryan is sitting at the dinner table with us for family meal time! I clean it thoroughly after each meal but after 3 months of use it still looks great!

Microwave, Food processor and ice cube trays– My must haves for making baby food. (A Mini Food Chopper is a great alternative to a food processor for a lot less money!) I made all of Bryan’s baby food and I LOVED it! It was so easy and inexpensive too! I made a few big batches, froze them and would heat one ice cube per time (or a couple different foods per meal.) I would highly recommend making your own baby food if you are interested in that!

Spoons- These metal Munchkin White Hot Safety Spoons and plastic Munchkin Soft-Tip Infant Spoons are my favorite.

Sippy cups! We started introducing a sippy at 5 months. The Tommee Tippee First Sips Cup was the one he first learned on (but we dropped it and it broke!) The Playtex Spill-Proof Cups and Dr. Brown’s Soft Spout Training Cup are the ones we typically use.

Bibs! My mom made us some super cute embroidered cloth ones which we used mostly for pureed foods. However around 8 months we started doing a lot more table foods and those bibs didn’t hold up! We now exclusively use the wipe-off/ washable bibs. I often just rinse it out after a meal and use one for a day or two and then throw it in the laundry. We love these Bumkins Waterproof Bibs.

Playtime:

Sophie the Giraffe – Before we had Bryan we noticed that ALL our friend’s babies had this weird little squeaky toy that sounded like a dog toy. One of my dear friends got it for us and we wondered if it would live up to the hype. Well it took a few months, but it completely did. Bryan LOVED it! It’s a soft rubber texture that’s really appealing for little teeth to chew on. AND the legs? They fit perfectly in the back of little mouths. It is fairly expensive but I highly recommend it!

 Activity Mat – We loved our Skip Hop Treetop Friends Activity Gym that was actually recommended by a blog reader! Thanks! :) I loved the neutral colors and it was SO much fun for Bryan when he wanted to play but wasn’t mobile. He would roll around and grab the toys and shriek and laugh. Also a great place to practice tummy time!

Baby Einstein Discover and Play Piano – We didn’t introduce light/ sound toys until about 4 months to prevent overstimulation. This was the first one we got out for him to play with and he loved it!! It’s a fun little toy and he still likes to play with it!


Fisher-Price Click ‘n Learn Remote – Bryan started reaching for and eating our remotes every chance he got. I (might have over-reacted) when I read an article about a child ingesting a button battery and having serious injuries so we designated a remote without batteries for him to play with. BUT when I saw this toy? We got it and it quickly became a favorite


Fisher-Price Laugh and Learn Musical Table – One of my favorite things about this toy is that you can use the top without the legs on. We had it upstairs for Bryan to play with beginning at about 4 months. He pulled to stand for the first time at 6 months because he is a super gross motor baby. We put the legs on soon after and he began pulling to stand on it and playing with all the toys on the top! There is a laptop, a phone, a piano and a little book. There are a few different settings and have A LOT of different songs and sounds which is so nice for mama when baby plays with it off and on all day! :)

Reading:

We always read about 5-10 books before naps. Bryan loves it! He started to become very engaged at this age and will turn pages, smile and laugh at some parts and feel the textured pictures. Here are some of our favorites:

Good Night, Gorilla

Look, Look! (A newborn favorite that recently made a comeback.)

Brown Bear, Brown Bear, What Do You See? Slide and Find

Welcome Winter (& Spring & Fall!)

Peek-a-Zoo

Colors

Goodnight, I Love You

That’s Not My Monkey

Must Haves:

Sling or Wrap Style Carrier– I LOOOOOOVE babywearing. It has honestly been one of the sweetest parts of mothering. The Sakura Bloom Pure Baby Sling is personally my favorite for under 6 months or short trips/ around the house over 6 months. (Although I also own a Maya Wrap which made me love slings!) Wraps (like the Moby Wrap, Boba Wrap, Solly Wrap) have the same function but it’s just personal preference.

Ergo– Like I said the sling is my favorite and although I had a newborn insert for my ergo I found it bulky and awkward and never used it. HOWEVER – I have a chunky baby… And at 6 months he was nearly 20 pounds. Unfortunately the sling wasn’t cutting it for long trips. I started using the ergo when he was about 5.5 months and I LOVE it! It takes some getting use to putting it on but it is wonderful! It’s comfortable and doesn’t hurt my back even after long wear. I often wear him on my back to bake or cook and I know he’s safe, he’s happy because he’s with me… but he’s far enough away he won’t stick his hands in the food I’m making:)

Babies at this age are SO FUN!!! Enjoy! :)

You Might Also Like:


(Disclosure: Amazon affiliate links are above)

Posted in Lists, Our Son | 2 Comments

Peppermint Blossoms

IMG_4765

It’s still not too late to bake some delicious goodies! I actually made these last year for the first time as really liked them! They are so adorable and have a sugar cookie base without taking forever to roll out and decorate.

This is quite a small batch – I probably got 28-30 cookies. Feel free to double it if you are taking to a party or want to put in treat bags!

IMG_4767

Peppermint Blossoms

recipe from Hershey’s; As seen on Baked Perfection

Yields 28-30 cookies

Prep time: 20 minutes

Bake time: 25 minutes (plus cooling)

 Ingredients:

  • 1 bag Hershey’s Kisses brand Candy Cane Kisses
  • 1/2 cup (1 stick) butter, softened
  • 1 cup granulated sugar
  • 1 1/2 teaspoons vanilla extract
  • 1 egg
  • 2 cups all purpose flour
  • 1/4 teaspoon salt
  • 1/4 teaspoon baking soda
  • 2 tablespoons milk
  • Red and Green colored sugar; nonpareils or any other sprinkles you desire!

Directions: 

  1. Remove wrappers from candies. Place on plate and put in the freezer while preparing dough. Preheat over to 350 degrees F.
  2.  Beat butter and sugar in a large bowl until combined. Add in vanilla and egg and beat until fluffy.
  3. In a medium bowl, whisk together flour, baking soda and salt.
  4. Add half of flour mixture to butter mixture. Add milk. Finish with the rest of the flour mixture. Mix until just combined.
  5. Using small bowls, pour some of each color/ type of sprinkle in. Using a cookie scooper or your hands, shape dough into small uniform balls (about 1 inch.) Roll dough ball in the sugar/ sprinkles. Place on ungreased (or parchment paper) cookie sheet.
  6. Bake 8 – 1o minutes or until edges are lightly browned and cookies is set. Remove from oven; cool 2 to 3 minutes on rack. Press candy piece into center of each cookie. Remove from cookie sheet to wire rack. Cool completely.
Posted in Baking, Holidays | Tagged , , , | Leave a comment

Buckeye Bark

IMG_4638This has been on my to-bake list since last Christmas and I JUST got around to doing it… I don’t know what took me so long! This recipe was just like I hoped it would be– easy and delicious! My husband and I were stealing pieces until it disappeared:)

IMG_4640

I utterly LOVE the traditional buckeyes but man they take a lot of time and effort. I feel like it’s a “play” recipe where you take half the day and listen to Christmas music or have friends over and roll and dip to your favorite Christmas movie.

IMG_4639

This bark? It’s the same chocolately peanut buttery flavors and textures but about 1/4 of the time (or less?)

IMG_4642

Two things I will mention:

  1. 1. Let the peanut butter layer set up in the freezer before you pour the last chocolate layer on. (OR just leave plenty of time in the freezer after all layers are done for them to form together well.) The chocolate hardens quickly and the peanut butter layer takes a little longer so if you take them out early it will break unevenly and the peanut butter layer will be gooey (still good though!)
  2. 2. We stored ours in the freezer because #1. I think storing in the fridge would be fine but I would hesitate to store at room temperature for more than while serving.
  3. IT IS DELICIOUS. You still have a few days before Christmas! Make this!

IMG_4636

Buckeye Bark

15- 20 minutes hands on time
90 minutes inactive time

As seen on Live Sigma Kappa, originally from Big Red House

Ingredients:

  • 4 cups chocolate chips, divided
  • 1 16 oz jar (2 cups) of creamy peanut butter (do not use natural peanut butter)
  • 2 c Confectioners’ sugar
  • 8 tbsp unsalted butter, melted
  • 1 tsp pure vanilla extract

Directions:

  1. Prepare a large rimmed baking sheet with parchment paper. Set aside.
  2. Melt 2 cups of chocolate chips by your desired means. I usually use the microwave. Microwave for about 45 seconds and then stir vigorously. Microwave for about 30 more seconds (or 45-50 seconds on 60%). Stir vigorously. If you still need more time, pop it in for 10 seconds or so. Chocolate can EASILY burn in the microwave so it’s much better to do short increments.
  3. Pour chocolate on prepared baking sheet and using the back of a spoon or a spatula, spread to a thin layer. Place pan in freezer to harden up for about 10-15 minutes.
  4. While the bottom layer chocolate is hardening, it’s time to make the middle layer– the “buckeye center!” In a large bowl, beat together peanut butter, powdered sugar, melted butter and vanilla until combined. Take pan out of freezer and make sure the bottom layer of chocolate had hardened. Using a spatula spread peanut butter mixture over chocolate layer. Put in freezer for 30-45 minutes.
  5. When it is hardened enough, melt the remaining 2 cups of chocolate chips and spread on top of the peanut butter layer. Put in freezer to harden and let bark harden together for about 30-45 minutes.
  6. Break and serve! Store in freezer or refrigerator.
Posted in Adoption, Husband | Tagged , , , , | 2 Comments

My Journey with Induced Lactation

20131107-090102.jpgThere were a few physical things that I really desired when we were trying to have a baby. I really wanted to be pregnant, go through labor and delivery and exclusively breastfeed. When we couldn’t conceive I had to process through never being able to experience those. The first two are out of the questions, unless a miracle happens. Exclusively breast feeding is probably impossible but I knew breast feeding at all might not be a total loss. From my CLC training I knew that adoptive moms could possibly induce lactation. What did that mean and how the heck could I get there? Well that was what I was going to find out.

I love, LOVE the realm of breast feeding and so I really wanted to try. However after so many failures in infertility treatment, I didn’t know if my heart could handle another physical failure. After months of processing through our infertility and inability to conceive, I realized I can’t let my pride get in the way. I have to at least attempt this. I knew after we got our baby I would regret it if I never even tried.

Emotionally, I entered this differently than with infertility treatment. I was almost positive we would get pregnant. I was about 95% sure I wouldn’t be able to produce a drop of breastmilk. I told myself I would pump for 6 months and then if there was nothing, well I gave it my best and knew there was nothing else I could do.

I did lots of research and found a super helpful website called Ask Lenore. This was where I found the bulk of my information and this is actually the protocol I ended up using (her accelerated protocol.) I wanted to make sure it was okay under a doctor and it was really important for me to find a professional who had actually helped someone do this before! I did NOT want to be the expert. I met with my physician. She had no experience and couldn’t recommend someone to help. I talked to my ob/gyn. He also had never helped anyone and didn’t know any guidance. However he suggested I speak to the lactation consultant at Atrium. I had already talked to another one who offered some tips and had helped someone relactate but not actually induce lactation. At this point I was feeling frustrated and just wanted a doctor to tell me if the medicine I wanted to take was safe! I called my trusty old fertility doctor. He had actually helped someone who went through surrogacy induce lactation! She used the medication I wanted to use but she was in a different country and he didn’t know if it worked. Still- he had some inkling and could give me the info for the medication. Sold! I then met with the lactation consultant who was AMAZING!! She had done this a handful of times and used the exact same protocol I was looking at! She was a huge help and I really appreciated her.

From then on, I got my medications and started getting everything in line. It took me longer than I thought to do everything (see above) so it was the end of December by the time I was ready. The protocols have you take birth control (active pills only) and another medication for a while then you stop the birth control (to simulate labor’s quick change in hormones) and begin pumping! I was wishfully thinking for a baby in the spring so would only be able to be on the bcp/ med for about 6 weeks. I know the accelerated protocol gives less milk but I knew it may take a while to bring in a supply and I didn’t want to wait to start until we got a baby.

So after those 6 weeks I started pumping. I was pumping 8-10 times a day for 5-15 minutes a time. I was pumping at 3am, 5am and 7am and then every 2-4 hours in the day; usually twice at work and as much as i could in the evenings. In the last couple months before my baby was born when I could have been sleeping through the night I set alarms for the middle of the night. The only thing worse than waking up in the night is actually setting ALARMS! It was hard. I was so sleepy. My pumping schedule dictated my life. I pumped in the car, at friends houses, at work, just about everywhere I went.

I had my realistic expectations but was also growing hopeful. As luck would have it I started producing drops only FOUR days after I started! I couldn’t believe it! I started tearing up out of joy. And it was actually the morning after we got matched the first time- how perfect was that? It was emotionally harder than I thought it would be to pump and get absolutely nothing so I was thrilled when I got drops. It made me even more motivated– this might actually be possible!!

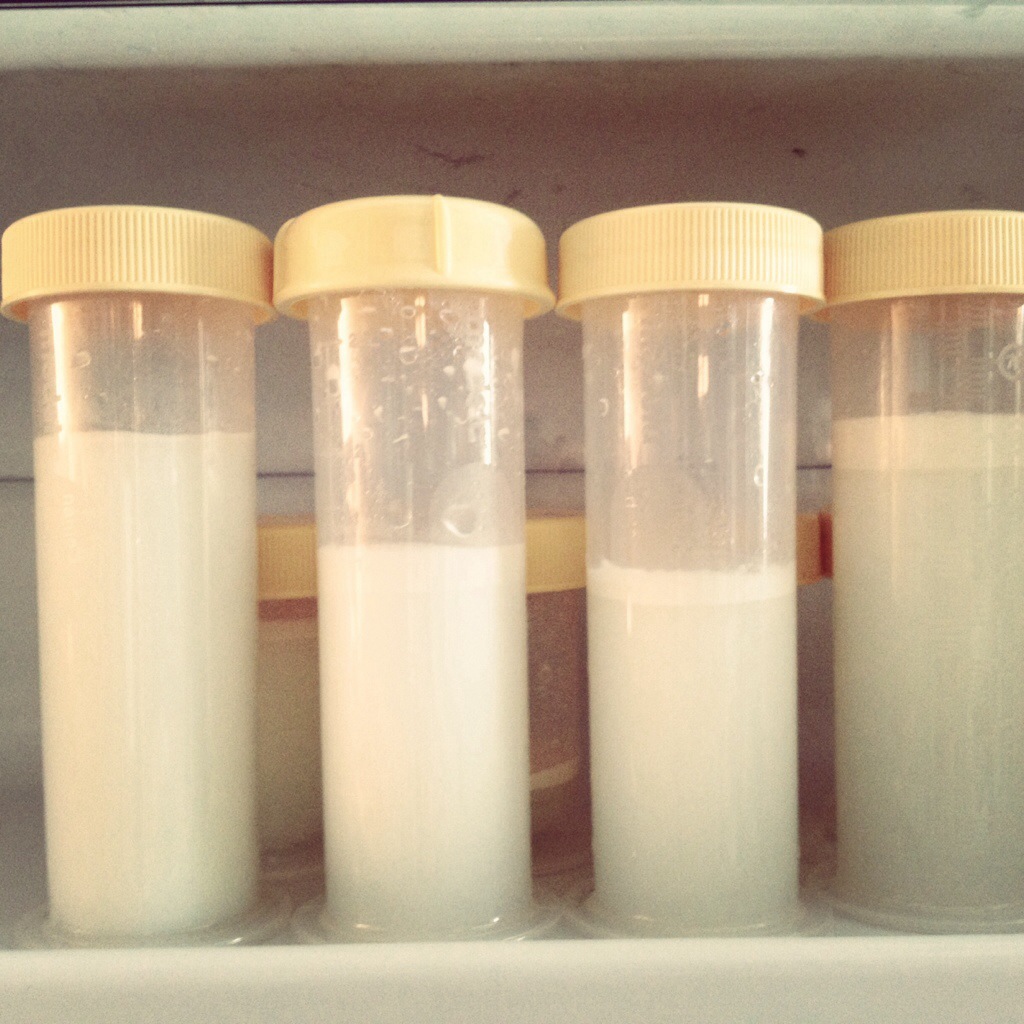
The first couple weeks I barely produced. Drops here, a little in the bottle there. But slowly and surely I started making more. By the end of the month I was making about 1/4 of an ounce every other day (all pumps combined for 2 days.) Not much, but enough to freeze for my baby to be!!

Then, we got the call our match fell through. I was devastated. We got the call at about 6pm. I didn’t pump all that evening and couldn’t bring myself to pump that night. I thought to myself “What for?”

But that next morning, I got out my pump. It was a huge act of faith for me to continue… to trust even though this match didn’t work out we would actually get a baby sometime- and sometime soon! And I didn’t want to throw away all my hard work just because I was so disappointed. Good thing I didn’t! Our little one was born on on Sunday and we found out about him
on Monday!

I continued to pump in the hospital although it was hard to tear myself away from my little man to go to the pumping rooms. The crazy thing is- my pumping almost quadrupled once he was here! I was only pumping about 3-4 ml per day before. The first time I held him and pumped I got 10 ml! In one time! Breast feeding is so amazing. You make more milk once your body knows there is a baby you need to feed. Incredible.

Since he wasn’t officially ours for the first 3 days in the hospital they had fed him formula with bottles. He wanted to suck constantly so the pacifier was his best friend. After his birthparents signed the papers, we got to feed him the first bottle of my pumped milk!! It was so amazing. We also got to switch him to donor milk! Yay for having exclusive breastmilk for a month! I tried to latch him on but after just a few days he was already such a bottle baby. I used a supplemental nursing system a few times and the SNS with a nipple shield. He would take that sometimes but it was such a hassle and he would often go from completely asleep to starving so he would be screaming for 10 minutes while I set it up. Not great. And a few times he would seem like he was eating but just have milk going all down the back of his shirt. Being in an open room in the hospital wasn’t great for trying either because I would either have to get screens up (and find them!) or ask a nurse to go into this one private room (if it was available.) My original dreams were to feed him at breast then give him a bottle to finish eating. It didn’t look like that would happen so I changed my goals! I decided once we came home I would try at breast a little more and best case scenario he could snack or comfort nurse. We came home and I tried a handful of times. He didn’t have a great latch and I never even knew if he was getting much. Sometimes it would make him madder- I’m assuming because he would get just a little and he wanted more! I changed my goals again and said if he is ever at breast- amazing- but I aim to pump for 6 months so he can keep getting fresh breastmilk (and re-evaluate then!)

I began working hard on my supply (upped my meds a bit and power pumped a few times) and by about 3 months I was making 2-3 ounces a day! I was feeding him a 4-5 ounce bottle of my breastmilk every other day.

When he was 4-5 months, I was making 3-4 ounces a day! He was getting a 4 ounce bottle of my milk daily! Such a blessing! Since my most recent goal was pumping until 6 months, at 5 months I thought through if I wanted to stop. There were definite perks to stop pumping – the biggest being the 1.5-2 hours a day I would free up. However I just wasn’t comfortable with it. I didn’t feel ready. I LOVE feeding him a bottle of my milk and know it has huge benefits even if it’s just a little bit. So I said I would go throughout the calendar year! Nine months seemed like a great stopping point for me.

I started weaning down my medication and pumping sessions the last couple weeks of November. My supply dropped rapidly and emotionally I was getting ready to be done. I ended up pumping for 9.25 months and giving my baby breastmilk for a little more than 8 months! Stopping is definitely bittersweet. I’m looking forward to not having to pump throughout the day but am a little sad to be done giving my baby my milk. But overall? I’m thrilled. I never knew if I would produce a single drop much less give him milk for 8 months!!

No it wasn’t the exclusive breastfeeding, the beautiful at breast relationship or extended term breastfeeding I had originally hoped for. But for us? It was a gift. I’m so beyond grateful I got to experience this with my son.
——————————————————–

Interested in inducing lactation yourself? Here are some tips and things I found useful:) Hope it helps!

Practical Things You Need:

  • An IBCLC to partner with, support you and help you. Call your local hospital.
  • Medication needed for your protocol if you go that route. A doctor who will monitor you and answer questions as needed.
  • A good, double electric breast pump. You can often rent them from hospitals. I rented one and also borrowed one from a friend to be portable. The borrowed one seemed to bring in more milk for me and so I returned the hospital grade one.
  • Pumpin pals! SO much more comfortable than the ones that come with pumps.
  • Freezer bags or small colostrum bottles to freeze milk if you get some before your baby comes.
  • Nursing bras or tanks and breast pads. I loved these cloth ones! Also it’s nice to have nipple cream on hand. I used this.

The Other Important Things to Know in Order to Succeed:

  • Be patient. It could take a LONG time. And pumping with absolutely no result is kind of demoralizing. Hang in there. Know it could be a long road.
  • Know inducing lactation is really hard work. It takes a lot of drive to stay with the protocols.
  • Continually reframe your idea of success if necessary. Don’t be afraid of failure. Of goals changing. Of screwing up and falling behind for a bit. Of uncomfortable looks from people. If your baby latches on once or you can give your baby one drop of your fresh breastmilk that is a HUGE success. If you decide to stop- that’s ok!

If you’ve made it to the end, I salute you! Thanks for reading my story!!

Posted in Adoption, Infertility, Motherhood | Tagged , , , , , | 4 Comments

Christmas Goodies!

So I don’t put a lot of stock in my page views on my blog, but they stay fairly consistent. So a few days ago when they went from a few hundred views a day to 2,600 I was taken completely aback!! There were like 4-5 days where they were between 1,500 to 2,500! So what was up? One word: PINTEREST. It’s all from my Christmas goodies the past couple years! So I decided I wanted to make sure to bring those to the surface for you lovely readers. Enjoy!!

Triple Chocolate M&M Cookies

Triple Chocolate M&M Cookies from Hoping in God

Peanut Butter Blossoms

Peanut Butter Blossoms from Hoping in God

Oatmeal Cinnamon Chip

SONY DSC

Gingerbread Men – these take a while but they are super soft and taste very good

SONY DSCHello Dollies – my family’s tradition :)

SONY DSC

Thumbprint Cookies

SONY DSC

Chocolate Candy Cane Kiss Cookies

SONY DSC

Reese’s Peanut Butter Cup Cookies – my favorite!

SONY DSC

Chocolate Mint Crinkles

SONY DSCM&M Blondies

SONY DSC

Kris Kringle Cookies

SONY DSC

Oreo Peppermint Truffles – easy and CRAZY good!!

Oreo Peppermint Truffles

AND… the recipe that has brought the pinterest party people?

The Best Rolled Sugar Cookies!

SONY DSC

And don’t forget these old classics!

Peppermint Bark

Ginger Cookies

Buckeyes and Fudge

Homemade Thin Mints


Posted in Baking, Holidays | Tagged , , , | Leave a comment

Start You Advent Baskets Now!

Advent Basket

So for the last few years I’ve blogged about advent baskets. If you don’t know what an advent basket is or how to do it, click here to read my post on that!!

Just a friendly reminder… Even though Fall has just started its time to start planning now! You want to deliver your basket by December 1st so that means all organizing, shopping, and wrapping has to be done by the end of November. Trust me– it sneaks up on you!!

Advent Basket

I remember when I received my advent basket. It was during a really difficult time during our struggle with infertility that I had some dark days. I was dreading the holidays since its expected you be joyful and I was anything but. I was so shocked and surprised when I first saw it. And it was DELIGHTFUL! Two of my friends had organized for multiple women to contribute gifts and cards filled with encouragement. Every morning I was so excited to wake up and open my gift and I cried at most of them. It made what could have been an exceptionally hard Christmas so much better!

I thought it would be fun to share stories of how you’ve blessed someone with a basket or been blessed yourself.

So tell me– what’s your experience with advent baskets? Please leave a comment!

Posted in Friends, Holidays | Tagged , , | 2 Comments

Just In Case You Think I’m a Kitchen Wizard… (A Yummy Peach Blueberry Crumble After the Madness)

Peach Blueberry Crumble from Hoping in God

I have been LOVING peaches recently. I decided to bake something delicious with them and when I saw a crumble from Brown Eyed Baker I knew that was it. We were having a couple over for premarital counseling so it was perfect. The first thing I noticed was the steps were a little different than I was used to. Pre baking the crumble? A little unique but I was sure it would be great.

Peach Blueberry Crumble from Hoping in God

I started making the peach filling and it looked delicious. Crumble time! Every crumble is about the same so I went about my business. This recipe called for me to put it on parchment paper and bake. Also I doubled the crumble because that’s the kind of girl I am:) I popped it in to bake and went on with the rest of the dinner.

I opened the oven door to check on it a few minutes before it was done and low and behold! It was a melted mess! The bits of crumble had melted into one sheet and about 1/4 of it had dripped onto the bottom of the oven. Fantastic. I tasted it to see if we could still get away with using it and although it tasted a bit caramelly it was rubbery and I didn’t think it would work. So this is why you don’t make new recipes for company! Ha!

Thankfully I had made other crumbles that worked out so I quickly got out one of those recipes (which had oats in it- my favorite way!) The crumble ended up being DELICIOUS!! The inside was delightful and the oat topping on the top was perfect.

Peach Blueberry Crumble from Hoping in God

If you’re brave- try to make it the original way… I’m sure mine was a total fluke!!

Peach Blueberry Crumble from Hoping in God

And the best part of the story? I was cooking something the next day and my oven caught on fire. Yeah. Guess I probably should have cleaned that sugar butter mixture up. Whoops. Luckily myself and my oven got away unscathed. My fire alarm went off and my baby didn’t even wake up. So that’s a win. Although I was jumping up and down with pillows trying to wave all the smoke away. I’ve had finer moments.

Peach Blueberry Crumble from Hoping in God

Peach Blueberry Crumble

Fruit Recipe from Brown Eyed Baker
Crumb Topping from startcooking.com by Heidi Adkisson

Ingredients For Filling:

  • 2 pounds fresh peaches – peeled, pitted and sliced 1/2- 3/4 inch thick
  • 1/3 c. sugar
  • 1 1/4 t. cornstarch
  • 1 T. lemon juice
  • 1/4 t. cinnamon
  • 1/4 t. salt
  • 1 c. blueberries

Ingredients For Topping:

  • 1 c. old fashioned oats
  • 1 1/2 c. flour
  • 1 1/3 c. firmly packed brown sugar
  • 1 t. salt
  • 2 t. ground cinnamon
  • 1/2 t. ground ginger
  • 1/2 t. ground nutmeg
  • 2 sticks unsalted butter

Directions:

  1. Peel and slice your peaches. In a large bowl, gently toss the peaches and sugar and let stand for 30 minutes, stirring occassionally.
  2. When done, preheat oven to 350 degrees.
  3. Set a colander over a bowl. Drain the peaches, reserving the drained juice.
  4. In a small bowl, whisk together 1/4 c. of drained peach juice, cornstarch, lemon juice, cinnamon and salt. (Throw away any extra peach juice).
  5. Return the peach slices to the large bowl. Pour juice mixture on top. Pour blueberries in and gently fold all together. Spoon or pour mixture in 9×13 inch pan.
  6. Make your crumble. In a medium sized bowl, pour in oats, 3/4 c. flour, brown sugar, salt and spices and mix.
  7. Cut the stick of butter lengthwise (like folding a piece of paper hot dog style!). Turn it and cut the butter crosswise into little cubes of butter.
  8. Transfer butter to the bowl with dry ingredients. Use your fingers to work the butter into the mixture. You want the butter to stay cool, so work quickly and don’t over mix. You won’t the mixture to be similar to wet sand, forming moist clumps when it’s ready. I like there to be some big chunks.
  9. Sprinkle crumble over peach/ blueberry filling. If it seems full, place a cookie sheet underneath to protect your oven if it bubbles over.
  10. Bake at 350 degrees for about 45 minutes or until topping is brown and peaches are soft. Serve warm with ice cream.
Posted in Baking, Domesticity | Tagged , , , , | Leave a comment

Favorite Baby Items- For 2-4 Months

20130813-095341.jpg

Fun sounding/ rhyming books and lots of toys- We read all the time. Since my son was just a handful of weeks old, he started smiling at some of these fun books. He also has started playing with his toys like crazy. It’s so fun! I wrote about my favorite books and toys here!

A couple large quilts for tummy time!! Absolute necessities:)

Skip Hop Treetop Friends Activity Gym – This has quickly become a favorite! He loves laying on his back, talking to and grabbing at the toys. He loves to flip over, grab the different textures on the mat and look at the

Skip Hop Mirror – We got this separately but use it on the mat. Well loved!

Sakura Bloom Pure (Linen) Baby Sling – This is my new sling and I am absolutely IN LOVE with it. You may know how much we adore baby wearing and this sling has quickly become a new favorite. It’s cool for the hot summer and so comfortable. I have the color pool and it is just stunning. I get so happy whenever I get to wear it:)

Munchkin Nursery Projector and Sound System– This has been amazing for bedtime. It’s calming and is Bryan’s biggest cue that it’s time to sleep. We use the projector sometimes but I think as he gets older, we’ll use it more. It also has a soft, blue nightlight which is great for nighttime feedings.

Bottle Drying Rack – This is a MUST have. We use Dr. Brown’s bottles and have two sets of pump parts and small bottles that are drying too. We usually have 2 additional paper towels with things drying but if we didn’t have this rack, my entire counter top would literally be covered with bottle parts.

Tide To Go Pens– In my diaper bag ALWAYS. Perfect for little spills and food that falls on slings while babywearing.

OxiClean Spray– I have a super spitty baby. When I wash his clothes I douse the neck and shoulders (and anywhere else he spit up on!) with this. No stained clothes yet! (Knock on wood)

Bouncer– We borrowed this bouncer from my sister in law. We’re not big on containers but this lives in the bathroom and has been PERFECT to allow mama to shower.

Rain for Roots: Big Stories for Little Ones – This is a music compilation of Sandra McCracken and some other folksy women in her genre. It’s children’s music that I like to listen to too! Each song is based on a different bible character or story – David, Moses, etc – with the overarching theme that God is big and alive and loves you! Great lullaby music to calm down before bedtime or in the car.

Mamas & Papas Baby Snug – We got this instead of the bumbo because I felt like it was sturdier and I love that when your baby learns to sit, you can just take the inside out and it becomes a little chair! Bryan is such a mover that he doesn’t love this but it’s nice to put him in something for 5-10 minutes when I’m getting my lunch ready or going to the bathroom.

And of course some of our newborn favorites as well like Aden + Anais Muslin Swaddle Blankets,

SwaddleMe – I upgraded to the larger sizes and used these from 2-4 months. He started busting out at about 4 months but he also seemed to need them less at that age, so it worked out.

Motorola Video Monitor – We now use our video monitor ALL the time since he’s sleeping in his crib. We absolutely love it and always brag on it!!

So there you have it.

Favorite Baby Items for 2-4 Months on Hoping in God

What are your favorites for this age?

Related Posts:

(Disclosure: Amazon affiliates are above.)

Posted in Lists | Tagged , , | Leave a comment